
|
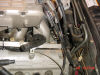
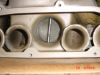
DSC00391
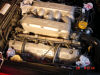
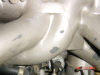
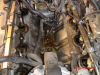
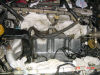
After having beer and supper with Chris Ford, Levi Hanson and Diane Hanson I decided to get things prepped for the intake removal Saturday. I had planned on just getting tools ready and intake tubes and cleaner removed, but by the time I called it quits I had also unbolted the throttle cables, removed the fuel rail covers, unplugged the injector connectors, drained the fuel rails and had them unbolted and ready for removal. Following the detailed instructions was easy. Openings plugged/covered to prevent ANY bolt or small object from going where it shouldn't.
Photographed by: David Schmidt
Photograph taken on: 4/29/2001
|
|
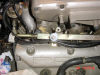
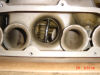
DSC00392
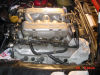
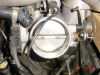
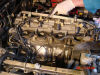
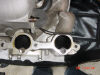
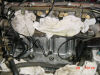
Passenger side fuel rail drained, unbolted and ready for removal. Hardest thing so far was figuring out how the injector plug removal tool fit. Once I figured that out I was able to get them all unplugged quickly.
Photographed by: David Schmidt
Photograph taken on: 4/29/2001
|
|
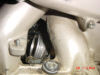
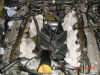
DSC00393
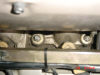
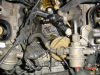
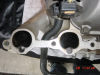
Drivers side with fuel rail ready to remove. The instructions had indicated that removing the fuel rails with the injectors attached could take up to an hour to get the injectors to come out of the injector holes. I found that both fuel rails came out quite easily by CAREFULLY using a long screwdriver as a lever to gently lift each end of the fuel rail until I felt the injectors release. Total time to lift both fuel rails and get all injectors free was about 10 minutes.
Photographed by: David Schmidt
Photograph taken on: 4/29/2001
|

|
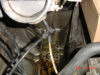
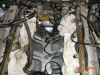
DSC00394
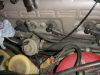
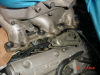
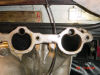
The instructions had said to unplug the knock sensor connector if there wasn't enough play in the cables. The connector was routed UNDER the fuel rail so I just left it plugged in. I did remove the passenger side intake bolt holding the air cleaner bracket and removed the air cleaner bracket before lifting the fuel rail to give the underlying cables room to move up with the fuel rail.
Photographed by: David Schmidt
Photograph taken on: 4/29/2001
|
|
DSC00395
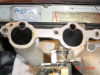
The area immediately around the injector holes was quite dirty so I brought in the vacuum cleaner and vacuumed up as much loose debris as I could around the injector holes.
Photographed by: David Schmidt
Photograph taken on: 4/29/2001
|

|
DSC00396
More oily grit around injector holes.
Photographed by: David Schmidt
Photograph taken on: 4/29/2001
|
|
DSC00397
Chris Ford arrived about this point to help me out. Up until now there wasn't much potential for cable routing confusion but we figured it was time for some safety pictures to make sure I knew where all the cables were BEFORE weI took them off. Passenger side cam cover breather hoses have been removed at this point.
Photographed by: David Schmidt
Photograph taken on: 4/29/2001
|
|
DSC00398
Driver's side rear hose/cable routing
Photographed by: David Schmidt
Photograph taken on: 4/29/2001
|
|
DSC00399
Driver's side front hose/cable routing. BTW, it looks like the fuel rails may have been removed before judging from the dents already in the fuel rail. Maybe that explains why the injectors came out so easily for me.
Photographed by: David Schmidt
Photograph taken on: 4/29/2001
|
|
DSC00400
Mass Air Flow sensor and collar removed. We've now unbolted the intake and lifted it onto 8" sections of two-by-fours. We then started disconnecting the various connectors under the intakes.
Photographed by: David Schmidt
Photograph taken on: 4/29/2001
|
|
DSC00401
Our first view of the "V" taken from the firewall and looking past the throttle body opening. Note the "extra" bolt we later noticed after we finished removing the intake. It appears to be a fuel rail bolt (but I removed and have four other bolts so this must be a "former" bolt).
Photographed by: David Schmidt
Photograph taken on: 4/29/2001
|
|
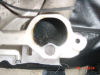
DSC00402
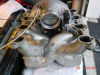
First view of bad flappy actuator. Tucked between the throttle body and intakes and impossible to remove without removing the throttle body. Unfortunately I'd been lead to believe that you didn't have to remove the throttle body to get to the actuator so I didn't order the throttle body gaskets. No big deal as I'll also be ordering more hoses and other gaskets to replace worn ones found under the intake.
Photographed by: David Schmidt
Photograph taken on: 4/29/2001
|
|
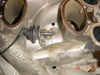
DSC00403
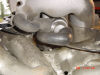
Here is where we hit our biggest snag of the day. The throttle cable has a cap which fits onto a ball on the throttle body arm. This cable must be unhooked before you can fully remove the intake. That cap would just NOT come off. Finally after about 45 minutes, liberal WD-40 application, many different tools prying and four hands pulling in various directions it finally popped off. Note the ball on the end of the slightly bent throttle arm.
Photographed by: David Schmidt
Photograph taken on: 4/29/2001
|
|
DSC00404
Cable locating shot. From the firewall looking forward into the "V". Note the connector clip wire which had fallen off when removing one of the fasteners and the forward knock sensor at the top of the picture.
Photographed by: David Schmidt
Photograph taken on: 4/29/2001
|

|
DSC00405
Passenger side intake sitting on the two-by-four block. Making sure we know where all the cables and hoses were routed. Note the washer under the breather hose. It hadn't wanted to come off with the bolt protruding. Remember this washer for later.
Photographed by: David Schmidt
Photograph taken on: 4/29/2001
|
|
DSC00406
Driver side intake on the wodden block. Again, just noting where all the cables/hoses are.
Photographed by: David Schmidt
Photograph taken on: 4/29/2001
|
|
DSC00407
Intake finally removed. Here's our first un-impeded view of the "V" from the front of the car. Here we first notice the old fuel rail bolt. The rear knock sensor is visible in this picture.
Photographed by: David Schmidt
Photograph taken on: 4/29/2001
|
|
DSC00408
Chris points out two intake bolts on the driver's side that still had the collars on them. The other 8 had come up with the intake and were removed, bagged and labeled later. Also note the vacuum hose routing and other cable routings.
Photographed by: David Schmidt
Photograph taken on: 4/29/2001
|

|
DSC00409
Passenger side. Note that one of the intake bolts came unscrewed instead of the attached nut. We left the nut attached to the stud rather than remove it so we can get the stud in easier later. Immediately after these two photos we plugged all intake openings with rags to prevent things from falling in.
Photographed by: David Schmidt
Photograph taken on: 4/29/2001
|
|
DSC00410
One upside down intake and throttle body sitting on the front of the car (on a rag on top of the service cover). Noting all hose locations.
Photographed by: David Schmidt
Photograph taken on: 4/29/2001
|
|
DSC00411
View from the other side. Note hose attachments and routing.
Photographed by: David Schmidt
Photograph taken on: 4/29/2001
|
|
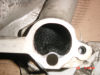
DSC00412
Looking down into the intake tubes I was amazed at the gritty, oily buildup inside. No wonder cleaning and polishing intakes can improve horsepower! Note hose routings.
Photographed by: David Schmidt
Photograph taken on: 4/29/2001
|
|
DSC00413
More hose routings.
Photographed by: David Schmidt
Photograph taken on: 4/29/2001
|
|
DSC00414
MORE hose routings.
Photographed by: David Schmidt
Photograph taken on: 4/29/2001
|
|
DSC00415
No hoses here, but being complete.
Photographed by: David Schmidt
Photograph taken on: 4/29/2001
|
|
DSC00416
A bit blurry, but just LOOK at those nasty deposits.
Photographed by: David Schmidt
Photograph taken on: 4/29/2001
|

|
DSC00417
Chris Ford in his overalls. Just looking cool with the intakes now in my shop. By the way, remember that washer I told you to remember earlier? Here is where we started bagging all the intake bolts, washers and hose fittings and came up with only NINE washers. Hmmm...not on the bench, not on the floor. Chris finally found it INSIDE one of the intake holes UNDER the rag we'd stuff in to prevent just such a mishap. Quickly removed with a magnet part removal tool. I'm REAL glad I counted the washers at this point.
Photographed by: David Schmidt
Photograph taken on: 4/29/2001
|

|
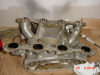
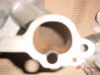
DSC00418
Intake with throttle body removed.
Photographed by: David Schmidt
Photograph taken on: 4/29/2001
|
|
DSC00419
At last! The flappy actuator. Removed and tested it was confirmed bad with a leaking diaphram. I would have been unhappy at this point to find a working acuator as that's why I'd gone through all this!
Photographed by: David Schmidt
Photograph taken on: 4/29/2001
|
|
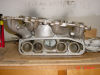
DSC00420
We decided to remove the intake side plates to see how far up the carbon buildup went. They looked a bit varnished, but no carbon. At this point we called it a day. We jacked up Chris's car to check his wheel bearings and ended up tightening up the driver's side wheel bearing which should help stop his car's wandering.
Photographed by: David Schmidt
Photograph taken on: 4/29/2001
|
|
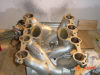
DSC00421
Sunday evening after spending the day with family I decided to start the cleaning. Here's an intake tube before cleaning.
Photographed by: David Schmidt
Photograph taken on: 4/29/2001
|
|
DSC00422
Here's a tube after cleaning with brake fluid, a small brush and some old cloth diapers I use for shop rags now. On some of the intakes I was able to push the rag far enough into the tube (while twisting it) to grasp it at the other end and pull it back and forth.
Photographed by: David Schmidt
Photograph taken on: 4/29/2001
|
|
DSC00423
MUCH nicer looking after a full cleaning.
Photographed by: David Schmidt
Photograph taken on: 4/29/2001
|
|
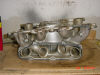
DSC00424
Side view with cover off.
Photographed by: David Schmidt
Photograph taken on: 4/29/2001
|
|
DSC00425
...and the other side.
Photographed by: David Schmidt
Photograph taken on: 4/29/2001
|
|
DSC00426
Flap closed
Photographed by: David Schmidt
Photograph taken on: 4/29/2001
|
|
DSC00427
Flap open.
Photographed by: David Schmidt
Photograph taken on: 4/29/2001
|
|
DSC00428
Now some views of the "V" after first cleaning/degreasing (Simple Green spray). Note the rags stuffed into every intake hole. However, after the washer incident I'll be examining each intake before putting things back together. Just in case!
Photographed by: David Schmidt
Photograph taken on: 4/29/2001
|
|
DSC00429
Another picture of the "V" from the front of the car.
Photographed by: David Schmidt
Photograph taken on: 4/29/2001
|
|
DSC00430
Passenger side of the "V".
Photographed by: David Schmidt
Photograph taken on: 4/29/2001
|
|
DSC00431
Driver's side
Photographed by: David Schmidt
Photograph taken on: 4/29/2001
|
|
DSC00432
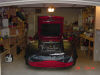
Two views of the car in the "Porsche garage". (I started calling it that the day we bought the house. Six months later it was true.) Guess I'll be driving my Explorer for a few days (sigh).
Photographed by: David Schmidt
Photograph taken on: 4/29/2001
|
|
DSC00433
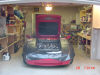
I turned off the flash for a brighter overall exposure. Bit blurier though. There's a wood stove in an alcove at the back of the garage to the right. The workshop is straight back through the back door.
Photographed by: David Schmidt
Photograph taken on: 4/29/2001
|